
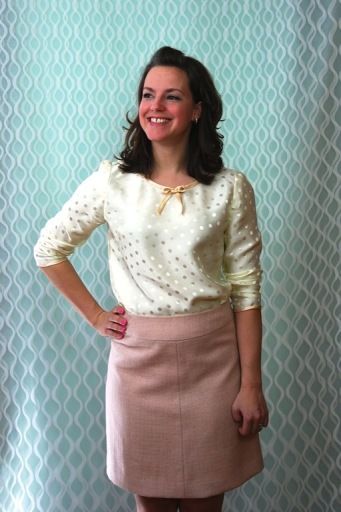
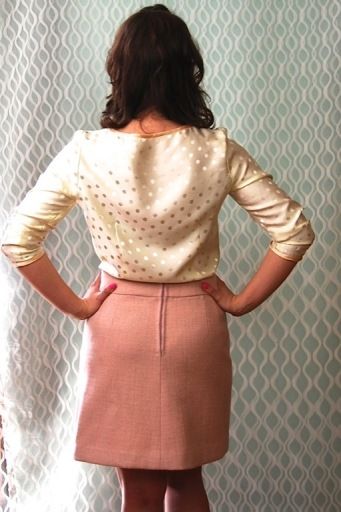
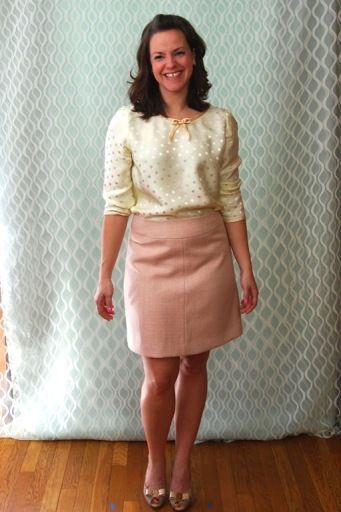
Finally! Actual photos of work done :) It took me the majority of last week to finish these two pieces! The skirt is Simplicity 1717, an Amazing Fit pattern. The skirt I thought I would be in love with, but the muslin actually turned out better than the final skirt. When I finished, the waistband seemed about an inch too big. At the time it was too late to fix it. I should have tried it on as I went, but that was the whole point of making the muslin, right?!?! Go figure.
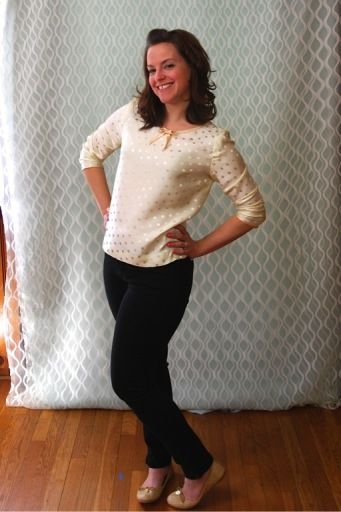
The top was from BurdaStyle magazine, the February 2013 edition, #135. I am in love with this top! I got so many compliments on it, everyone was shocked when I told them I had made it. (Don't you love that feeling!) The silk, which I bought from Gorgeous Fabrics, was slippery and difficult to work with, but it feels great on.
There were a few new techniques that I tried with this top. I inserted the sleeves in flat, made silk charmeuse bias tape and then bound the edges with the silk tape.
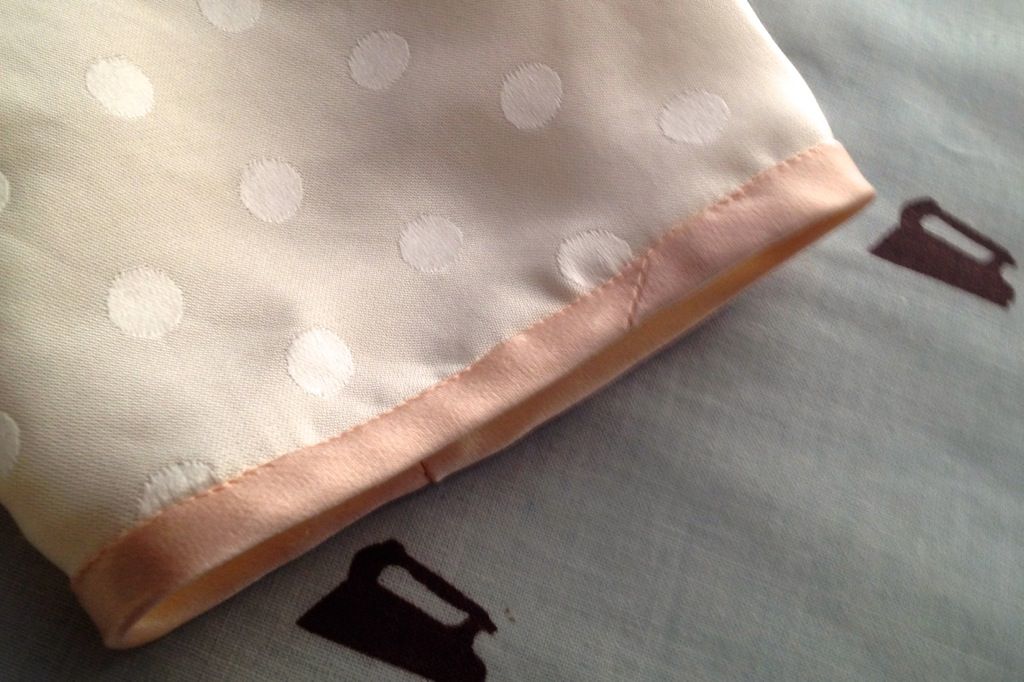
Let's talk a little about making bias tape. I used this book to help me with the step by step of the whole process, from cutting to ironing. Last Friday night I started making the bias strips around 11 pm. I cut the silk, joined the strips and then started to iron the tape. I did not have a bias tape-maker. Has anyone made double fold bias tape this way?!? It is some kind of torture, I tell you! I went to bed around 1 am with singed fingers and the full upper edge to iron of my two and a half yard tape, then I still would need to iron it in half. The next day, a handy little Clover bias-tape maker found its way into my hands (thank god Laurel saved all her mother's sewing aides, so really, thanks Susanne!!). Let me just say that those people at Clover are GENIUS! Once I had that fun gadget it took me all of a twenty minutes to make the tape. I actually had to iron out all the work I had done the previous night, but it was soooo worth it. Not completely couture, but at that point (we were now at Sunday morning), I didn't care :)
I had only inserted sleeves flat into a shirt one other time. For those who don't sew, it is exactly what it sounds like: you sew the sleeve to the top of the blouse, before sewing up the side seams, so it is all flat — hence the name. When I made the Negroni for my husband, it had called for flat sleeve insertion. This was also two years ago, so I was a little rusty. I brushed up using this book. After I had attached the sleeves I just had to close up the entire side seam, from wrist to waist. Much easier I think with silk then trying to fiddle with easing the sleeve in the small arm hole. Sleeves have never been my strong point.
I altered the pattern and the construction of this top from the original sparse instructions from Burda. First, I made the sleeves 3/4 length, which you can't really tell from the photos, but they are. Promise :) I dropped the neckline by an inch and widened it a quarter inch of an inch or so. I also shortened the hem by about two inches. And I also added darts in the back. Otherwise it was a little too blousey for my frame. When I was tracing the pattern, I accidentally traced fisheye darts from another rendition of this pattern, but after the first muslin decided I needed them. The only thing I didn't do was when I shortened the hemline, I forgot to shorten my darts, so they ended up in the hem. Whatever.
The hem. Wow, hemming silk is kind of a pain in the ass. Even with my seams being traced directly on the fabric, they still were a little wonky when they were done. But since the fabric is so fluid, it is hard to notice. I mean *I* notice, but that is because I am always super critical of my own work ;)
Oh, one more thing I changed to the top was the way the tape was applied. The original instructions had just bias strips folded in half and applied on top of the blouse and top stitched down. I though this was stupid. Yeah, I said stupid. So instead I bound the edges. My final edging is about a quarter inch thinner than theirs, but I think it still looks great!
The skirt was made with a designer wool from Ireland. I underlined it in silk organza and lined it with china silk. I inserted a hand-picked vintage metal zipper using this tutorial from Tasia. Very helpful indeed. I wasn't sure if I would like the way it would look, but I ended up loving the final result! No wonder people prefer these to invisible zippers! I hand-overcast my seam allowances to the silk organza and also catch-stitched the hem in place as well.
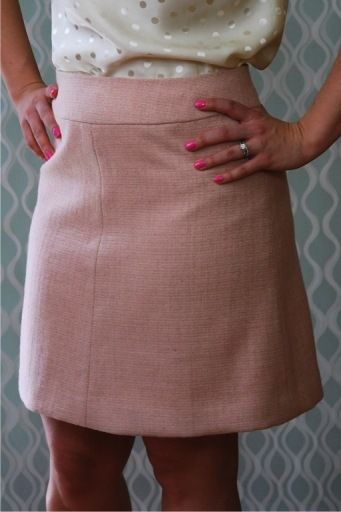
As I stated earlier, the final fit if this skirt was different than my muslin. So obviously the change in fabric must have really altered the way it fit. This was a little disappointing, but I can still try to save it.
All in all I am pretty happy with the two patterns and the way the pieces turned out. All the ladies at the shower loved both pieces and I thought they worked perfectly for the event. I am not sure if I will wear them paired together again, it is very girly, but I am not worried about finding other things to wear with each. I can already tell you that I want to make the top again, I ended up ordering a yard of the black charmeuse from Mood, so I am thinking white or ivory chiffon and that! Should be swoon-worthy!!
So. Final reveal done! Now this weekend I will relax and nap. Or maybe cut out the new Laurel pattern :)
Have a great weekend!


So cute! These pieces look adorable together, and the top looks so cute with pants! Great job! I just used a Clover bias tape maker for the first time last week, and I can't believe how much easier it is to do it (I only burned myself twice instead of the usual 18 times!).
ReplyDeleteThey are the like the best things EVER! I am a total convert! It makes me want to bind everything with pretty silk bias tape!! But I won't.
DeleteWell, maybe :)
Perfect outfit for a bridal shower. Love the fabric for your top (love spots). You've done a beautiful job on both outfits. You have the same amount of sewing books as I have, and aren't they a great resource. Bias tape maker - before I bought mine, I used a pin secured on my ironing board and threaded the tape through that - worked the same, but the Clover tape maker is much easier/faster. Yes, I love it when they say "did you make that?" Can't wait for the next project but have a rest first.
ReplyDeleteThanks, Evelyne! Yes, the Clover tape maker was such a time saver, I am so glad it is now in my life! I will try to rest, but there are just so many things that I want to sew!! :)
DeleteBEAUTIFUL! You've done an amazing job and I adore your fabrics. The polka dot blouse may be my favorite thing ever! It's absolutely gorgeous
ReplyDeleteI think it is my favorite as well! Definitely have more plans for that little number :)
DeleteSuccess! They both turned out amazing :)
ReplyDeleteThanks, so much!! I am really proud of them :)
DeleteYou know... Susanne is smiling down on this whole outfit. In fact she is so proud of you and all of your sewing skills! - I know this for a fact ;)
ReplyDeleteThanks! That means a lot :)
Delete