Well, here is the final project finished with my photos and really fancy photos taken by the photographer. You will be able to tell which ones are mine and which are hers. Trust me.
This whole project was a lot of fun. Stressful, at times, but fun. I learned a boatload — we worked with vintage lace, reconstructed a new design from an existing dress, constructed a fitted boned bodice, and used couture techniques to finish the inside. All of this combined with helping my friend turn her mother's wedding dress into something she was excited and emotionally moved to wear. I had help, mind you! That lace would never had been cut if it was just me alone. The original owner of the dress, the MOB, did that. Still the thought of having to do that fills me with a little dread. Thank god for moms! It is not perfect, but the bride was happy and that is all that matters.
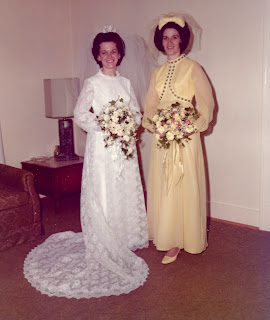
So let's start with a pic of the original. Remember this?
Circa 1970. A high neck, long sleeved, empire waist a-line wedding dress that consisted of a full lace overlay and a lined bodice and skirt. It also boasted a yard or so of tiny ruffled lace trim, *and* some sewn/glued sequins on the front of the dress. These are still to be found around the house and cars of those that were involved.
Last post, which was in November (shame on me!), I talked about how we were going to piece together the bodice to form the sleeves. Which is exactly what we did. Anne, the lace master and MOB, pieced the sleeves together by matching the lace pattern and cut the new pieces out of what we had. Here is the sleeves basted and cut for bodice — pinned for fitting.
The bodice was created using the Butterick 5731 as the base. I took Gertie's Bombshell dress class and used that to sculpt the boned bodice. The techniques I learned in that class, stabilizing the v-neck, using spiral-bound boning, underling, shaping the cups, adding a waist-stay, and stitching the lining in by hand, helped the bodice look more like a RTW than a homemade dress than I could have hoped for. One thing I did learn (unfortunately) was how you can over-press satin in a blink of an eye. It was covered by the lace and trim, so it wasn't noticeable, thankfully!
For the outside bodice we found a off-white satin at Win-Mil fabrics. We purchased about 5-6 yards, but had plenty left over. For the underling I used muslin, and for the lining used a ivory kona cotton. We found, since the bride was wearing a long-line bra, with the first muslin I used a slippery bemberg lining and the two kept sliding all over each other. For the final version the cotton lining was the best decision. That combined with the waist stay— nothing was moving at all!
Next we attached the original skirt to the newly created bodice. But first, since we started with an empire waist we needed to slim it down a bit, and then attached it at the natural waist. Even after that we realized then we needed to do some tweaking. We put pleats in the back to account for the extra width, and eased the lace to the waistline of the satin. Here is our super-high tech way of getting the pleats right:
Once they were spaced as evenly as we could get them, we attached them to the bodice. Let's not talk about how uneven that waist seam is. Please. Good thing we had decided to go with a sash!
Now that you have seen the crappy phone photos, and the pictures of wonky waistlines, why don't we see what it looked on the big day!
Finally, two of my favorite photos:
me and the blushing bride!
Yay!
I will post more about my bridesmaid dress in the photos soon. I would say sooner than later, but clearly I am not as good with the upkeep as I would like :)


WOW WOW WOW - That is amazing. The amount of work that you put into that dress - good on you!!! Love all the photos - it's a beautiful designed dress and professionally made. You should be proud of yourself!!
ReplyDeleteThis comment has been removed by a blog administrator.
ReplyDeleteHi, just wanted to let you know that I appreciate your post. I hope there will be more good posts here!
ReplyDeleteReworking a vintage dress is such a labor of love and so much more work than making one from scratch! I recently did my first one (blogged here http://sewingocd.blogspot.com/2013/02/tgif-thank-god-its-finished.html). It was so stressful knowing that the fabric couldn't be replaced, and mine wasn't nearly as important as yours! Great job
ReplyDeleteGreat job on your dress! It is such a labor of love — you have to *really* want to do it and know exactly how or try to figure out how to get there fast ;)
DeleteA-MAZ-ING! I am looking to do this to a dress as well and am so inspired now!
ReplyDeleteBest custom tailored shirt Bespoke Tailor HK
ReplyDeleteCongrats
ReplyDelete